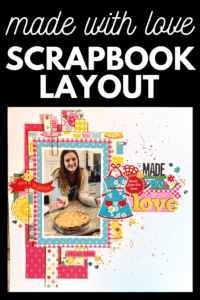
Love You Scrapbook Layout (Great For Beginners)
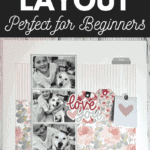
Are you searching for quick and easy scrapbook layout ideas? This may be the design you’ve been looking for.
Plus, this design is great for any level of scrapbooker. It’s a simple layout perfect for someone who is just getting into scrapbooking. Or for more advanced scrapbookers looking for a quick page, this is a great option!
Products by Felicity Jane and using black and white photos work so well with the simplicity of the page design. I might be a bit biased but I think turned out to be a beautiful page.

This post may contain affiliate links. This means if you click through and buy, we may earn a small commission. (At no cost to you.) Please see our full disclosure for more details.
What You’ll Need To Make This Layout
To create this page I used the beautiful Millie collection by Felicity Jane.
From this collection I used the:
- 3 patterned papers from the Millie Paper Pack
- Millie Die Cut Shapes
- Millie Designer Tag Set
* If you are looking for a monthly subscription. This is one of my favourites! The collections are sooo beautiful!
- 2 sheets of white cardstock – I used Bazzil White
- foam adhesive squares
- black journaling pen
- tape runner adhesive
To print these photos I used my Canon Selphy photo printer. I selected the N-Up Layout on the app that comes with the printer.
I trimmed the photos down a bit and ended up being 3 3/8″ by 2 5/8″.
Seriously I had to get my husband to tell me what these measurements were. I am by no means a “measurement” person, so please feel free to eyeball it. I would.

How To Make This Love You Scrapbook Layout
Start With Your Cuts
- Cut the bottom section of the patterned paper background 10 inches by 5 inches. This is the large floral patterned paper in my layout.
- Cut the top section of the patterned paper background 10 inches by 3 inches.
- For the paper behind the photos, cut your paper 10 inches by 3.75 inches.
- Cut your white cardstock for your photo mats. You will need 3 pieces of 3.5 inches by 2.75 inches.

Time To Assemble Your Page
- Start with your cardstock background.
- Place the two sections to make up the patterned paper background. It’s easier to start with the largest side. Place it two inches from the bottom and one inch from each side. Repeat with the top patterned paper section.
- Adhere your photos onto the three white cardstock mats.
- Place your matted photos onto the light blue paper. Start placing the photos at the top leaving the same spacing between the top and the sides.
- Stick down the strip of paper that goes behind the photos. I placed mine one inch from the top and bottom. And it is just a bit over 2.25 inches from the left side of the page.
- Use one of the tags from the designer tag set to write your journaling and decorate your page with whatever embellishments you’d like!
Looking for more ideas? Find more scrapbook layouts Click –> Here