Scraplift: Love Scrapbook Layout
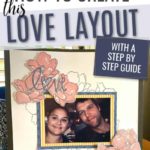
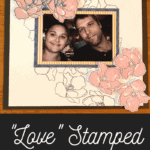
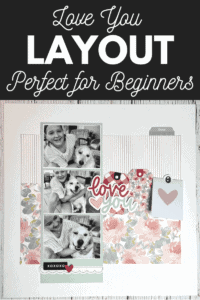
Sometimes it can be hard to figure out how to use stamps in your scrapbooking. It can be a challenge for me. I recently purchased the Grateful Heart Stamp Set by Altenew and knew right away that I wanted to use it to create a layout for this picture of my husband and me.
This love scrapbook layout was so fun to make! It helped me step out of my comfort zone.
Along with the challenge of using stamps, this layout also gave me a chance to use up some of the old patterned papers in my stash.

This post may contain affiliate links. This means if you click through and buy, we may earn a small commission. (At no cost to you.) Please see our full disclosure for more details.
Products Used
- Archival Jet Black Ink Pad by Ranger Ink
- Navy Paper from Carta Bella Metropolitan Girl Paper Pad
- Shimmer Spray
- 3D Foam Adhesive
- Adhesive Runner
- “Love” Die Cut by My Favorite Things
- Victorian Velvet Distress Oxide Ink Pad by Ranger
- Yellow Striped Paper from Crate Paper Neighbourhood Collection
- Sizzix Big Shot Die Cut Machine
- Liquid Glue

Are you new to scrapbooking and not sure where to start? Check out our article the Ten Tools You Need To Start Scrapbooking
How To Make this “Love” Scrapbook Layout
Step 1
First cut your white cardstock to 11.5 x 11 inches.
Stamp flowers onto white cardstock.
I started at the bottom right corner and worked my way up to where I knew I would put my photo. Alternate the direction of the stamps for a more random look.
I used stamp A0 from the Altenew Grateful Heart stamp set with Ranger Archival Ink in Jet Black.


Step 2
2. Next, you’ll stamp six flowers onto white cardstock. I used textured cardstock because I wanted a “vintage feel” to the flowers (Bazzill White) that I cut to fit in my stamp positioner tool. ( I recommend the MISTI stamp tool)
Ink the black outline using A0 from the Grateful Heart stamp set.

Step 3
Once your black outline is complete, line it up as best you can with stamp A1 with your first black outline. (Refer to the handy layering guide in your stamp set to see which parts of the stamp are the easiest to line up)

When you’re ready to stamp, ink it up with Victorian Velvet from Ranger Ink. (or whichever ink sparks your creativity!)


Step 4
Once you’ve completed the six flowers, and they have dried fully, fussy cut them out with your scissors. Or use the accompanying die set if you’ve got it.
I’ve cut them out with scissors leaving a small white border around each flower.
You can also keep layering with the stamps for a more detailed flower!

Step 5

Cut out the word love with your favourite die cut machine or Cricut. Or you can also use letter stickers or stamps.
I used my Sizzix Big Shot with this Love Die Cut by My Favorite Things.
Step 6

Once you have the “love” die cut and the six flowers ready to go spritz them with your favourite shimmer spray.
You can easily create your own glitter spray by mixing some Perfect Pearls with water into a Mini Mister.
Step 7

Cut your patterned paper for photo mats (the photo I’ve used is a 4 x 6)
The measurments for the photo mats are:
- Navy Patterned Paper – 5 x7 inches
- Yellow Stripes – 4.5 x 6.5 inches
Step 8

Place your photo and mats in the centre of the page with the flowers.
After I’d stuck down the photo and papers I found that something was a bit off, so I decided to stamp more of the black outline flower peeking out from behind the papers. It would be so much easier to stamp behind by just sticking down some repositionable tape to secure your photo mats down lightly, stamping your flowers and then adhering with some permant adhesive afterwards.
Step 9

Once the photo and mats are secured where you’d like, it’s time to place your flowers.
Three at the top left and three at the bottom right. Use foam adhesive to pop the flowers up off the page.
Step 10
Finish off this love scrapbook layout by adhering it to a 12 x 12 sheet of black cardstock.
And you’re done!
Save It For Later